Crab Wontons

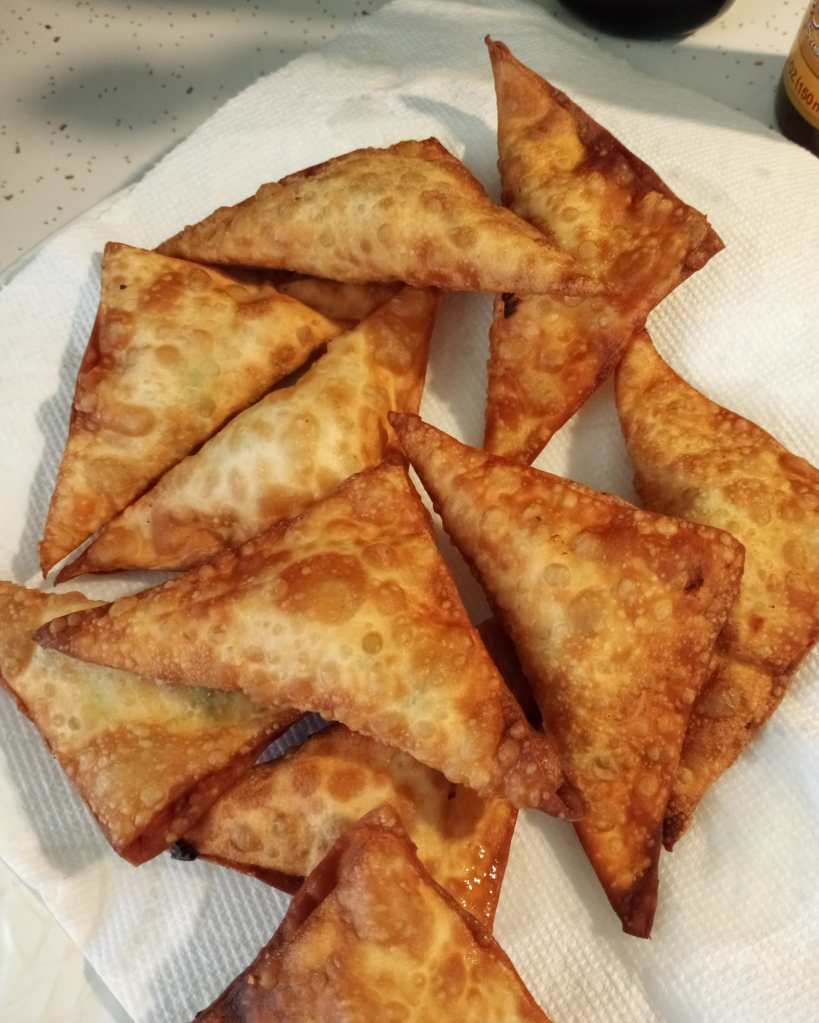
These little pockets of deliciousness are something I have to have every time I go out to eat Chinese food. The warm cream cheese interior with the crisp fried shell make these what I would consider one of the most perfect bites of food. So I had to figure out how to make them for myself. It’s cheaper then buying them and you can eat however many you want in the comfort of your own home without the tiny lady who runs the restaurant silently judging you from behind the counter.

I don’t call these things rangoons even though they have all the same ingredients because I tried desperately to make that little parcel shape with the four folds, but after failing the first two and nearly crying I stopped and decided triangle shapes would be just fine.

Tips:

Absolutely wait until your cream cheese comes up to room temperature. Don’t make the mistake I made because you will fight the mixture the entire time you are trying to combine it.

Make sure you have a fine chop on your green onions.

You can make these without the crab meat for a vegetarian option.

Ingredients

  • wonton wrappers
  • 1 8 oz pack of cream cheese
  • 2 green onions finely chopped
  • 1/4 pound imitation crab meat
  • a splash of soy sauce
  • vegetable oil for frying
  • 1 egg beaten for egg wash

Directions

  1. Place three inches of oil in a pot and begin to heat it. You want the oil to be between 350 and 360 degrees Fahrenheit. (You want enough oil to cover the wontons once they’re in the oil.)
  2. Put all your ingredients into a large bowl and mix to combine. It’s alright if your mix is a little clumpy because once they’re fried it will be warm and creamy.
  3. Egg wash all four sides of your wonton wrapper and place a dollop of your filling in the middle.
  4. Seal it up into a triangle shape.
  5. Once your oil is up to temp fry them for two minutes. Flipping the wonton half way through to get an even cook on both sides.
  6. Serve with whatever dipping sauce you enjoy.

Tiffin (Kitchen Sink Fridge Cake)

Tiffin is a confectionary delight that comes to us from Scotland. It’s not baked in fact the only heat that comes to this little beauty is when you melt the chocolate and truthfully if you aren’t looking to turn on the oven you can melt the chocolate and golden syrup together in the microwave. This makes it the perfect treat for when the weather is warm and you need something to please a crowd.

Ingredients

  • 1/4 cup golden syrup
  • 1 stick butter ( cut into chunks)
  • 4 oz milk chocolate(cut into rough chunks)
  • 4 oz. dark chocolate (cut into rough chunks)
  • About 10 biscuits crushed (I used Mcvities digestive biscuits. )
  • 1/4 cup golden raisins
  • 1/3 cup whoppers (or other honeycomb centered candy)
  • 1/4 cup dried cherries
  • 1/4 cup slivered almonds

Directions

  1. In a medium size heat proof bowl put your chocolate, golden syrup, and butter. You can melt this together one of two ways ( either over a pan of lightly simmering water OR in short bursts in the microwave.)
  2. In another bowl mix together all the rest of your ingredients. Then pour your chocolate mixture over your ingredients and stir to combine.
  3. In an 8×8 pan lined with parchment paper pour your mixture and smooth it out on top.
  4. Place in the fridge for at least an hour to chill and set up.
  5. When its completely set cut into equal pieces.

Strawberry Olive Oil Cake

So I know this recipe is not like traditional olive oil cake recipes I looked at, but I’m still gonna call it olive oil cake because that was the inspiration for the recipe. Instead of milk I used olive oil and the result is a rich delicious cake with the bright flavor of strawberry. You will not be able to stop eating. It will call to you like the ocean calls to moana.

Ingredients

  • 2 cups flour
  • 1 cup sugar
  • 1/2 cup (1 stick) butter
  • 1/3 cup olive oil
  • 1 egg
  • 1/2 cup sliced strawberries
  • 2 tsp baking powder
  • 1 tsp vanilla extract
  • 1/4 tsp salt

Directions

  1. Preheat oven to 350 degrees Fahrenheit. Grease a square 8×8 cake pan and line it with parchment paper.
  2. In the bowl of your mixer with the whisk attachment cream together your sugar and butter until it’s fluffy.
  3. Add your egg and vanilla and whisk to combine.
  4. Add all your dry ingredients and whisk to combine. It will be slightly dry.
  5. Slowly whisk in your oil until you get a well combined hydrated batter. You may need more oil or you may need less. It will be a slightly thick consistency.
  6. Fold in your strawberries until well distributed.
  7. Place in your prepared tin and bake for 40 minutes. It will still look soft but will firm up as it sits.
  8. Top with powdered sugar and serve to happy people.

Baked Scotch Eggs

A scotch egg is a British dish that consists of a soft boiled egg wrapped in sausage and covered in a herbed bread crumbs coating. Its then either baked or fried till the coating is crisp. I baked mine because home frying is a skill the eludes me.

Ingredients

  • 1 pound pork sausage
  • 4 soft boiled eggs
  • 1 tsp garlic powder
  • 1 tsp onion powder
  • 1 tbsp fennel seed
  • Salt/pepper
  • 2 tbsp basil, chopped
  • 2 tbsp parsley, chopped
  • 1 cup panko bread crumbs
  • 1 egg, beaten

Directions

  1. Preheat oven to 400 degrees Fahrenheit. Line a baking sheet with parchment paper.
  2. Place sausage, onion and garlic powder, salt and pepper and half your chopped herbs in bowl and combine well.
  3. In two smaller bowls put the beaten egg in one and in the other put your bread crumbs and herb mixture.
  4. Divide your sausage mixture into four equal parts. Flatten each sausage portion into a 4 inch circle.
  5. Place an egg in the center of the sausage party and wrap the egg entirely. Make sure no egg shows through. Do all four eggs like this.
  6. Dip each egg into the beaten egg bowl and let the excess drip off. Then roll in the panko and herb mixture.
  7. Place each egg on the baking sheet a couple inches from each other. Bake for 35-40 minutes until golden brown. Flip half way through to get even browning.

Smashed Chickpea Salad

Briny and Bright

I had never had a chickpea salad in my life till a couple of weeks ago. Now I keep at least two cans in my pantry cupboard for emergencies. Like I’m super lazy and I need something that is going to be light and filling at the same time. It’s a magic salad actually.

Ingredients

  • 1 can chickpeas, rinsed and drained
  • 1/4 red onion, diced
  • 3 dill pickles, diced
  • 1 clove garlic, grated
  • 1/2 cup mayo
  • 1 tbsp. pickle juice
  • kosher salt and pepper to taste

Directions

  1. Drain and rinse your can of chickpeas. Place in small mixing bowl. Using a fork mash the chickpeas leaving some of them still whole.
  2. Add onion, pickle and pickle juice and stir.
  3. Add mayo, garlic and salt/pepper and stir to combine.
  4. Optional: Lemon juice to add more acid.
  5. Optional: Celery to add more cronch.
  6. Optional: Tahini/more mayo to add more creaminess.
  7. Optional: Chili flake to add some heat.

This recipe is something I learned from one of the food editors of the basically column from Bon Appetit. It’s magic because the recipe could be adapted to what you have. This is the recipe that I used and It was delicious. Serve it in a wrap or on a sandwich. You could also just eat it straight out of the bowl with a spoon.

White Chocolate Macadamia Nut Cookie

Chewy and Delicious

Best cookies ever says my husband who doesn’t eat cookies. This was the first time I made a thin chewy cookie instead of a cakey cookie, and it just so happens to be my favorite cookie flavor so I was doubley happy for the win on this one.

Ingredients

  • 1 3/4 cup flour
  • 3/4 cup granulated sugar
  • 3/4 cup brown sugar
  • 1 stick of butter
  • 2 eggs
  • 1/2 tsp. kosher salt
  • 1 tsp. vanilla
  • 1/2 tsp. baking powder
  • 1 cup white chocolate chips
  • 1 cup macadamia nuts

Directions

  1. In the bowl of a stand mixer cream the butter, sugar, eggs and vanilla together.
  2. In a separate medium sized mixing bowl mix all your dry ingredients together to combine.
  3. Slowly combine the dry ingredients with the wet until well mixed.
  4. Remove the bowl from the mixer and fold in your chocolate and nuts.
  5. Wrap bowl in plastic wrap and chill for two hours.
  6. Preheat the oven to 350 degrees. Line two baking sheets with parchment and using an ice cream scoop drop cookies about an inch apart on the sheets.
  7. Bake for about 9 minutes until the edges are slightly browned.
  8. Let cool for a couple minutes on the baking sheet then move to a cooling rack.
  9. Either repeat the process with the leftover dough or freeze it to enjoy later.

Spicy Dill Pickles

Spicy and delicious

Due to the nature of this quarantine there has definitely been a shortage of shelf stable ingredients. So here in the bottomless chips home kitchen we are looking into learning how to make all those delicious bits and bobs that we depend on. I think we might call this segment…”What’s In That Jar?” That sounds good to me.

Ingredients

This makes two pint sized jars worth of pickles

  • 4 cloves garlic, smashed
  • 4 jalapenos
  • 4 mini cucumbers
  • 2 tsp. dill seed
  • 2 tsp. chili flake
  • 1 cup water
  • 1 cup distilled vinegar
  • 2 tsp. kosher salt

Directions

  • Wash and sanitize your new jars before putting your delicious pickles in them.
  • Place one tsp each of dill seed and chili flake in your jars.
  • Peel and smash your garlic cloves and place two in each jar.
  • cut the stem off your jalapenos and put two in each jar.
  • Cut your cucumbers into thick chips and put two cucumbers worth of chips in each jar.
  • Put the water, vinegar and salt in a small pot and bring to a boil. Dump gently over pickles until jar is almost full of liquid.
  • Seal your jars and place in the fridge for 7 days.
  • Eat delicious pickles!

These are really spicy which is what I wanted. You can either tone down the chili flake or omit it all together if you want.

Chocolate cloud cakes

Chocolate marshmallow madness

I am a person who bakes for fun. I never thought I would be here but here we are. So now my stir crazy boredom has given life to cloud cakes. Fluffy chonky cookies with fudgy chocolate chunks and marshmallow. I call it nut allergy friendly Rocky road.

Ingredients

  • 2 cups flour
  • 3/4 cup granulated sugar
  • 3/4 cup brown sugar
  • 1 tsp. Salt
  • 1 tsp. Baking soda
  • 1 tsp. Vanilla extract
  • 1 tsp. Ground cinnamon
  • 2 sticks of room temp butter
  • 2 eggs
  • 1/4 cup unsweetened cocoa powder
  • 1/4 cup buttermilk
  • 1/2 cup chocolate chunk
  • 1/3 cup mini marshmallows

Directions

  1. In the bowl of your stand mixer cream together your sugar, butter, eggs, vanilla and buttermilk together till fluffy and combined.
  2. In a separate bowl whisk together all dry ingredients till combined.
  3. Slowly combine dry ingredients with your wet until combined.
  4. Fold in your chocolate and marshmallow until mixed well through out.
  5. Bake in a preheated to 375 degree oven for roughly 18 minutes.

They are a cakey cookie because of the buttermilk so they take longer to cook.

Garbage Cookie

Salty Sweet Amazing

These cookies were put together during a rare night I got to myself. I needed something sweet and a project to keep me busy.

Ingredients

  • 2 1/2 cups flour
  • 2 tsp. baking soda
  • 1 tsp. salt
  • 2 sticks butter
  • 3/4 cup granulated sugar
  • 3/4 cup brown sugar
  • 1 tsp. vanilla
  • 2 large eggs
  • 1/4 cup pretzel pieces
  • 1/2 cup mixed candy(m&m, peanut butter cups, butterscotch bits, etc.)

Directions

  1. Mix your flour, salt and baking soda together in a small mixing bowl.
  2. In the bowl of a stand mixer cream your butter, sugar, vanilla and eggs together till light and fluffy.
  3. Add your dry ingredients to your wet ingredients till well combined.
  4. Fold in your mix-ins till evenly combined in your dough.
  5. Spoon out your cookies onto a parchment lined baking sheet. About an inch apart.
  6. Place a pretzel into the top of each cookie.
  7. Put in an oven preheated to 375 for 9 minutes till golden brown.

Ta Da! Garbage cookies!

The Everything Biscuit

I call it a biscuit and not a cracker because it doesn’t snap like a cracker does. It’s a little fluffy, but it stands up to dipping and the flavor is buttery and delicious.

Buttery and delicious

Ingredients

  • 2 cups all-purpose flour
  • 1 teaspoons baking powder
  • 1/2 teaspoon salt
  • 6 tablespoons cold unsalted butter, cut into cubes
  • 2 tablespoons vegetable oil
  • 2/3 cup cold water
  • 2 tablespoons everything bagel seasoning(I use trader joes version)

Directions

  1. Preheat your oven to 400 degrees. Line two baking sheets with parchment paper. If you only have one you are going to have to cook in batches.
  2. Put flour, butter, salt, baking powder and everything bagel seasoning in a food processor and blend.
  3. Put vegetable oil and water in the food processor and blend till the dough comes together.
  4. Flour your work surface and knead the dough for a moment till it comes together in a nice smooth ball. Divide dough in half. Roll out to about an 1/8th of an inch. Cut out with a small round cookie cutter or cut into small squares with a pizza cutter.
  5. Arrange on your baking sheets and poke holes in them with a toothpick. It will help stop some of the rise so they don’t puff up too high.
  6. Bake for 10 minutes. Put them on a plate or in a bowl to cool.
  7. Serve with cheese or dip or just eat them directly out of the bowl without sharing.